

Дізнайтеся, як друкувати власні високоякісні пластизольні термотрансферні плівки за допомогою чорнил SHALITEINK з низьким часом затвердіння.
Цей детальний посібник охоплює всі кроки — від матеріалів до термопресування — щоб допомогти вам легко отримати яскраві та довговічні відбитки.
Термотрансфери змінюють правила гри в багатьох сценаріях друку. Від шийних бирок та принтів на живих подіях до персоналізованих імен на футболках, вони пропонують гнучкість та ефективність. Хоча ви можете придбати готові термотрансфери, створення власних дає вам повний творчий контроль. Не знаєте, з чого почати? Цей посібник допоможе вам створити професійні термотрансфери з пластизолю за допомогою... ШАЛІТЕЙНК продукти.
Що вам знадобиться
Щоб зробити власні теплообмінники з пластизолю, підготуйте такі матеріали:
- Трансферний папір
- Порошок для перенесення клею
- ШАЛІТЕЙНК пластизольні чорнила
- Екрани
- Ракелі
- Машина трафаретного друку
- Конвеєрна сушарка
- Стрічка
- Термічний прес
- Пластиковий контейнер
Ці товари зазвичай можна придбати у місцевих або онлайн-постачальників послуг трафаретного друку. Вибір чорнила є критично важливим. Стандартні пластизольні чорнила зазвичай затвердівають при 320°F (160°C)Чорнила низького затвердіння, такі як ШАЛІТЕЙНК вилікувати приблизно 260°F (127°C), що робить процес перенесення швидшим та простішим. Нижчі температури означають швидше гелеутворення, менше деформації паперу та більш плавний робочий процес.
Процес друку
Перед нанесенням чорнила пропустіть папір для перенесення через конвеєрну сушарку. Папір поглинає вологу з повітря, що може вплинути на характеристики чорнила. Попереднє сушіння допомагає запобігти деформації — просто переконайтеся, що поверхня не перегріта. Рівна, суха поверхня є важливою.
Тепер найцікавіше: друк. Тиск ракеля є ключовим. Занадто сильний тиск виштовхує чорнило за межі трафарету; занадто слабкий не забезпечить повного покриття. Прагніть до збалансованого тиску, щоб отримати чисті та чіткі відбитки. Також уникайте нанесення чорнила занадто товсто, оскільки воно може сплющитися та деформуватися під термопресом. Відрегулюйте кількість сітки, товщину емульсії та тиск ракеля, щоб оптимізувати результати.
ПІДКАЗКА ЩОДО ЧОРНИЛА: ШАЛІТЕЙНК Пластизольні чорнила дуже непрозорі та яскраві, тому вам знадобиться менше проходів, ніж із напівпрозорими чорнилами, що заощадить час під час виконання великих обсягів робіт.
Нанесення клейового порошку
Насипте щедру кількість клейового порошку в пластиковий контейнер. Після друку помістіть папір для перенесення в контейнер, переконавшись, що ділянка, що зафарбована, ретельно змита з пилу. Обережно струсіть або проведіть пальцем по паперу, щоб видалити зайвий порошок і уникнути його утворення грудочок. Поверніть невикористаний порошок у контейнер для повторного використання.
Гелеутворення чорнила (часткове затвердіння)
Тепер час гель чорнило, не повністю його затвердіваючи. Гелеутворення висушує поверхню чорнила на дотик, водночас зберігаючи внутрішню частину незатверділою, що дозволяє йому прилипати під час термопресування.
Завдяки SHALITEINK's формула з низьким рівнем затвердіння, вам потрібно лише налаштувати конвеєрну сушарку приблизно на 200°F (93°C)Це швидше та допомагає захистити папір. Пропускайте кожен аркуш через сушарку, доки чорнило не висохне на дотик.
Застосування переказу до Одяг
Точні налаштування термопреса можуть відрізнятися залежно від типу термотрансферного паперу та порошку, але ось гарна відправна точка:
- температура: 350°F (177°C)
- Тиск: 4–5 (середня або тверда)
- час: 10 секунд
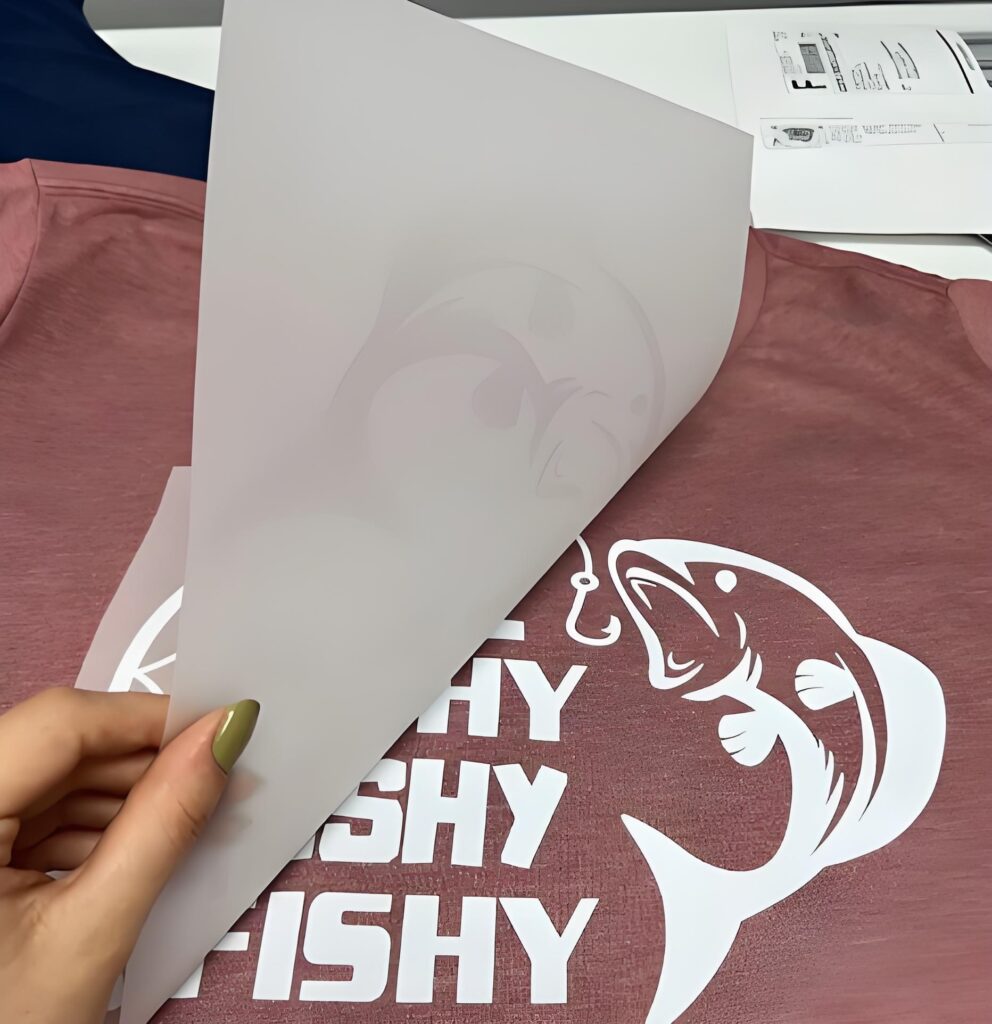
Покладіть переносний матеріал лицьовою стороною вниз на одяг, закрийте термопрес і притисніть.
- для гарячий пілінг переносів, зніміть папір одразу після натискання.
- для холодний пілінг, зачекайте, поки повністю охолоне, перш ніж знімати підкладку.
Ось і все — ви щойно створили професійну теплопередачу з пластизолю!
Пластизольні трансфери ідеально підходять для невеликих партій замовлень, індивідуальних дизайнів або друку на живих заходах. Виготовляючи їх самостійно за допомогою ШАЛІТЕЙНК продукція забезпечує стабільність, насичений колір та вигляд ручної роботи, який виділяється. Тепер, коли ви знаєте процес, настав час втілити свою творчість у життя — по-вашому.
